Showing posts with label Roof. Show all posts

Tuesday, December 8, 2020

Metal Roof

 This metal roof project took only 6 days to install, but it took 12 months to finally get a company to cooperate and do business with me. Jeez!

I have some comments about the metal roof. The critical part is definitely the measurements of the panels themselves.  On the alley slope I was 1/2'' off from totally perfect. The other side was actually perfect except for the width, which was not square and forced me to make a weird rip. It is a roof, but I didn't know to check the width in divisions of 16'' or I would've seen the last full panel was going to land in a spot that would make a terrible final ripped panel. I think the only way to start would be to rip the first panel or buy a 12'' panel to start with and make the last full panel end in a good spot.

But it's behind me. 6 days of work was agony on my old knees. The mind is willing but the body is wanting.

I will summarize this project at another time. If the measurements of the panels are right and even with a roof that is not square and has weird bulges and humps, it's still possible to push forward and get everything looking ok. A wise man said, "A roof is a rain deflection system." It's not waterproof. It deflects rain off the house. Something to ponder.


Thursday, September 3, 2020

Random Pandemic Projects

Like most people I'm troubled by current events. There's a saying that if you don't study history then you are doomed to repeat it. Well, I'm seeing a lot of repeated history by people who have studied history. So, isn't it fair to say that if you study history you are guaranteed to repeat it? Maybe merely studying history is not the way to avoid repeating history. Maybe we should study wisdom, not history. 

To replace punditry I've got some serious house projects that I'll describe the photos below.

I completed the insulation of the ceiling. I ended up with R70 in some places. A layer of R13, then perforated radiant barrier, then two layers of R30 and then 3/4'' insulated foam board custom cut to fit between battens where the metal tile ceiling is going to go. Installing fiberglass insulation in an occupied house is horrible. I am waiting to install the metal tiles in case the roof leaks and I need to find the leak, and also because this ceiling isn't that bad to look at. I think a light cream colored tin ceiling tile will be my choice.


The last remaining exterior wall with this crappy cardboard siding was looming but it involved working from my neighbor's yard since this adobe house was built exactly on the property line in the tradition of Sonoran Row Houses.  The decision to build on the property line is made all over mexico. the lawn is always in the interior of the property and never on the perimeter. The only way to accomplish that is by building the home on the perimeter, which isn't permitted in most cities that require a buffer between houses.

Zero insulation, zero house wrap, zero flashing around windows. It's just a shed attached to the house.
 My goal was to insulate it, replace any rotting wood (I found two board that were water rotten because the siding leaked near the window corners, and replace the windows with double glaze variety.

It only took about 4 days to replace the windows and insulate the cavities and then get new smartsiding. I was going to have a seam in the siding no matter what I did since the roof slopes above 8' long, so I decided to split the seam below the window. The strategy worked to allow me to lift the pieces since they were manageable even though I'm too old to be doing this kind of work in the heat.

The only debate was whether to nail the trim around the window and then cut the siding around the trim...OR to cut the siding around the window and then cover the seam with the trim. I've seen this done both ways but the strategy behind cutting the siding around the trim means you only need to remove the trim to remove the window. That makes sense except how often are windows replaced? It's like opening up a big area to leaks just for the convenience of being able to remove 4 boards of trim to take the window out. The strategy that I used was to cut the siding around the window, pretty tight, then fill the little gap with caulking...then cover the gap with the trim. This leaves very little room for water to get behind the siding, where it will run down the tar paper I used as house wrap. And that little sliver opening is covered with trim. But if the window ever needs to be replaced the whole piece of siding will have to be removed. See? But I cut the siding to be a single piece around each window so it will probably be easier to destroy that piece and replace it with a new one. Like I said, replacing windows is not routine maintenance so why would I make it easy at the risk of letting water get behind the siding? Debates like this take at least a month for me to resolve. Window installation is easy to get wrong.
 
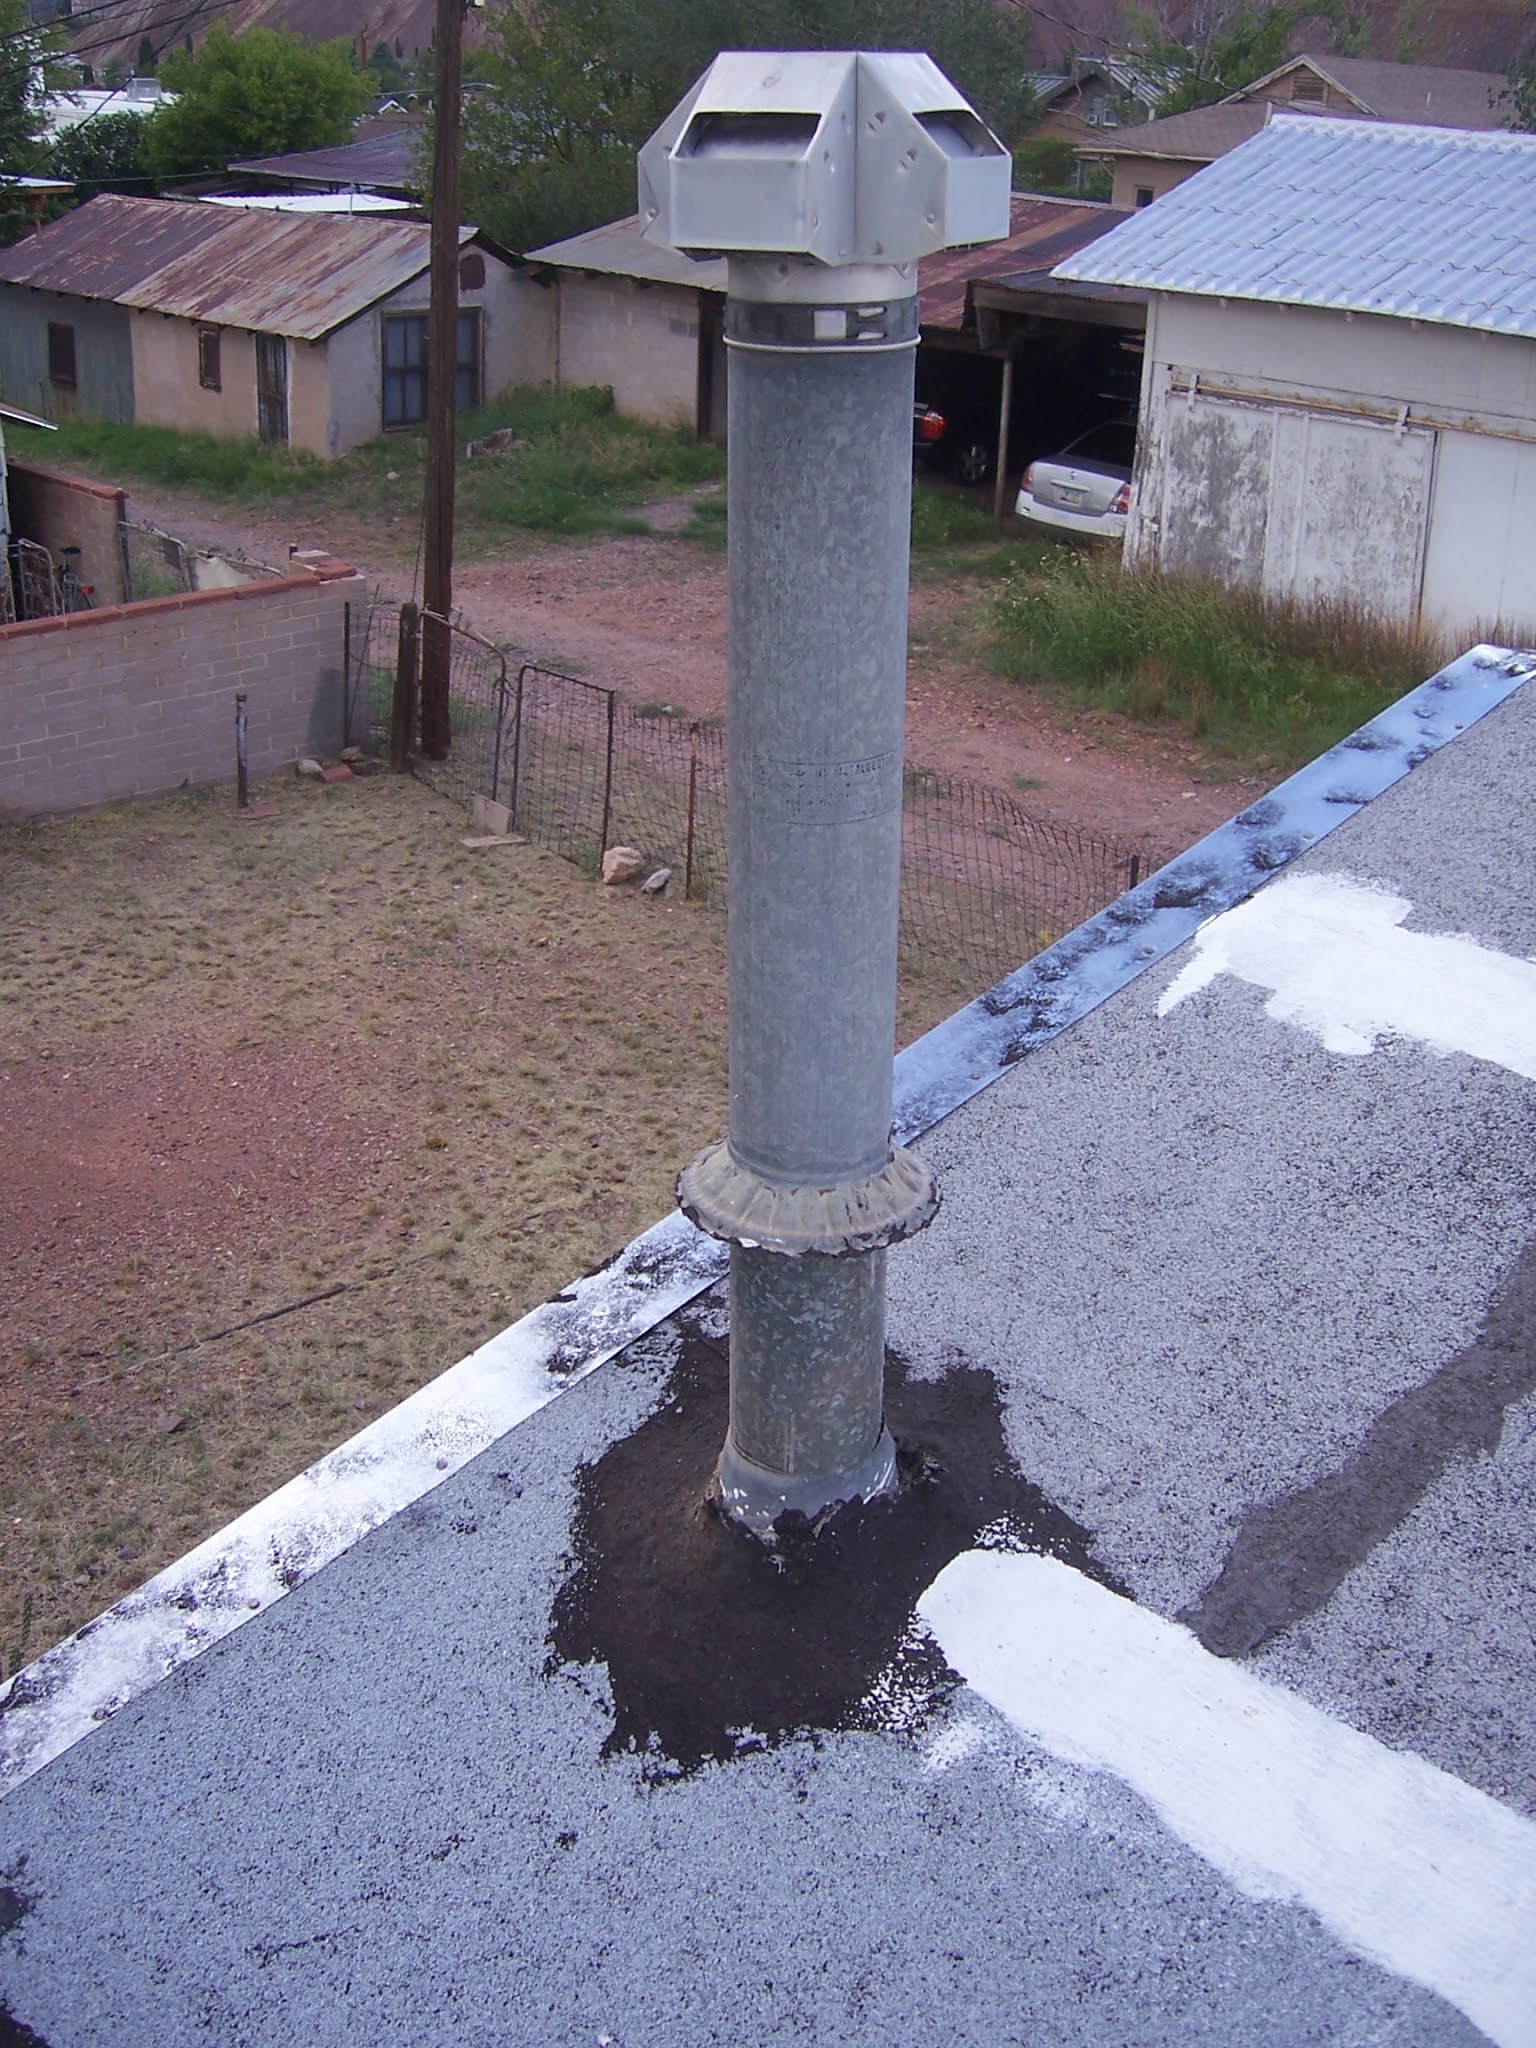
In preparation for the metal roof I wanted to relocate all the vents so they exit the gable side and not the roof. This particular vent is for the gas wall furnace that may or may not be useful now that I have 2 heat pumps. But I knew it was going to either be eliminated or at least moved.

In hindsight I should've just cut an area around that metal boot and torn it all up since the boot would not lay flat no matter how hard I hit it with a hammer. And I thought I was going to use purlins for the metal roof but now I'm leaning toward bubble insulation and this is going to be a little hump in the roof that will cause problems. So, I expect I will be tearing the patch out and making it flat so the metal panel will lay flat.

During all this there was an unexpected plumbing problem. Water from the kitchen and bathroom sink was backing up into the bathtub. I suspect it is an abandoned drain for the bath sink that had concrete and caulking inside the drain and that debris worked its way to the intersection with the tub and kitchen...and blocked the drain so the easiest path was back up through the bathtub drain. And when I went to investigate I found the Ptrap was actually buried in dirt and resting on a rock that had broken through the material. Miraculously, this didn't leak the whole time I was using it. I don't know why. Maybe it was perfectly sealed by the dirt. So, I went from blasting water with a nozzle jet through the drain and also whipping an auger around in there so it drained completely and easily (god knows what kind of debris I blasted down the drain)...to replacing most of the ptrap plumbing and the Tee and then learning about a bath tub shoe that goes under the tub. I replaced all that and for the first time the shower does not back up even a little when I take a shower. It drains faster than the water flows.

This was taken before I replaced the ridiculously old bathtub shoe part.
It's legitimately a 1-3/8'' size from 90 years ago that required a custom cut compression gasket for the mismatch connection...There are 1-1/4'' to 1-1/2'' gasket adapters and someone had taken one of those and snipped off a sliver of the 1-1/4'' side to accommodate the 1-3/8'' bath shoe. I thought this was clever since there is no such gasket made and it did allow the two sizes to effectively match and not leak. But I didn't like that solution so I bought a 1-1/2'' tub shoe and made a proper connection to the new 1-1/2'' tee. super exciting stuff. 

The water heater vent was always wrong, from day 1 it was wrong. There aren't supposed to be bends below 1' from the vent hood. There shouldn't be any tape. And the duct is supposed to be Type B gas vent that is double walled. So, the original attempt was wrong in every way except that it didn't actually vent carbon monoxide back into the kitchen and kill me. Since I was moving the vent exit from the roof to the gable I knew this was the time to replace the wrong vent pipe and why not cut a new hole in the ceiling so it only needed a straight piece to get out of the kitchen?


New Hole cut...debris fell into my cereal boxes

Temporarily cover the area with drywall since all that crappy cellulose ceiling tile is destined for the dumpster but I don't want to get into it right now because my hands are full and it will require covering everything with plastic tarp since the cellulose is awful stuff and should be treated as bad as asbestos. I hosed the area down with water when I was moving the two tiles to mitigate dust. There were 5 staples on the downhill side and 4 staples on the inside edge. That's all that is holding those tiles up since the other edges are tongue and groove.

This vent project was actually quite aggravating because assembling the correct double wall pipe in the correct lengths required trips to three different home repair stores and they all had different brands of pipe that was not compatible. There is Amerivent, Metalbestos, and some other brand. none of the connections really work together. So, I had to make it all work and in the process I purchased some flexible vent that I thought was going to work but it turned out that it was not supposed to go in attics or through walls or through ceilings. You might wonder where flexible vent duct CAN be used, and it's basically only suitable for inside a basement from one section to another section. That's it. Of course I snipped a hole in it when I was removing it so I can't return it. The lesson is to keep it simple and use pure double wall vent pipe...3''...Don't get fancy or use any gimmicks like flexible pipe. It'll cost about $80 to get all the right pieces and you should buy them from a single supplier so the brand is identical, but this stuff will last forever.

But I did successfully reroute the vent directly up from the water heater, then a 45 degree bend toward the gable, cut a new hole in the siding and then another 45 degree up, where I ran out of vent pipe and now the cap is like an inch above the roof. But it's 3 feet from a window, which is what the rule requires so, it's fine. 


This is the area between the two roofs. The new water heater vent now goes through the gable side of the fake attic. Doing this work in the heat of Arizona summer was tough. There's not much room in there to work and I had to cut a hole and connect it all. But I did feel that the gable vents are doing their job venting the attic area of hot air and vapor to the point that cutting a ridge vent would really be a bigger risk than I need. It was hot, but not hotter than my vented garage. So, the juice isn't worth the squeeze in that dept. The attic vents adequately. I'll add radiant barrier foil to the attic surface. So, I'm not venting the ridge.


I have this old pig leather jacket that could only be saved with an AZ state flag painting. For what it's worth, the colors are Buttercup Yellow, Sapphire Blue, Fire Red and Metallic Copper. There are 13 rays to represent the original colonies, the red and yellow represent the desert colors, the copper star represents the copper mines and the blue represents the vast oceanic shore Arizona is famous for.

I added two awnings made from asphalt roofing material. I wanted more shade but only had enough roofing to just barely fit over the window, which kind of exposed the bracket that I now suspect won't last very long. It's wood sandwiched to a perforated metal flat bar. The metal will last and the roofing will last, but I think the wood that I used to screw the roofing down will all rot away. Who knows? I had to angle the awning down because I only have about 4 inches of my property before it reaches the fence and a longer awning with a more flat angle would've crossed into my neighbor's yard and I didn't want to cause problems. The foliage in the foreground turned out to be a Buckhorn Cholla cactus and a spiky plum tree that cut me more times than I can count.

Most recently we had significant rain for the first time in months and a few holes in the roof leaked down to the original roof and then ran down to the eave where it leaked into the house. This required going back into the attic to find the holes and then go back on the roof to find the areas and cover them with more asphalt patch. I just want to buy some time until I get the metal roof. You can see the single nail hole leaked rain onto that 4x4 beam. Luckily this is the desert because that kind of leak could destroy that beam over time. It only sees rain 2 times a year.

The water heater vent is barely legal. I plan to add a 1 foot piece to get the cap above the ridgeline but that requires a trip into town and spending more money, which is in short supply these days. The bathroom window area needs work, but again, I am focused on the roof for now. No more spending money.


I think it's a drip scree that I made from a door sweep to kick the water off the door and off the threshold. It worked, but rain still creeps in under the threshold, which I will fix with more concrete to act as a dam.


Obviously not my house but a good example of my end goal.
 Desert Chic is the effect I am aiming for.

Well, that about catches y'all up. The next and last project I want to do is the metal roof. I an confident the install will take a week but the process of buying the package is taking weeks. No one wants to sell it to me because they aren't sure they can deliver it to this area and I can't find a rental truck big enough to fit a crate full of long roofing panels. It's dragging on.

On an unrelated note, I found myself updating a fan page for taco bell burritos. See, Taco Bell took 7 layer burritos off their menu. Fine, that's their prerogative. But I looked at their menu and they have bean and cheese burritos...to which a customer who loves fine dining like myself can add, lettuce, sour cream, tomatoes, seasoned rice and guacamole. See? You can add the exact ingredients to the bean burrito that were in the 7 layer burrito, thus making a 7 layer burrito. There's a connection here to home improvement but it's too complicated to explain. The joke is that Taco Bell removed the 7 layer burrito from the menu, but left a loophole in the menu that still lets you simply build a 7 layer burrito with add-ons. So, why didn't they simply have a pre-programmed button on the register that creates a seven layer burrito? Like a heritage button. Instead of having to say, "I want a bean and cheese burrito, no onions, add lettuce and sour cream and tomatoes and seasoned rice and guacamole." 
the cashier will say, "You mean a 7 layer burrito?" 
"yes. just give me the item that was on the menu for 30 years but they removed it and now I have to manually create it."

It would be hilarious if McDonalds removed hamburgers from their menu but left meat patties, cheese, and hamburger buns on the menu. 

So a customer has to say, "Give me a hamburger bun, one meat patty and a slice of cheese, pickles, no onions."

That sounds like a stand-up comedy bit. But the real joke is that my big accomplishment for the day is that I accessed the official fan site of Taco Bell and in the "history" of the 7 layer burrito, I added "This item was removed from the menu but the ingredients can still be added to a bean and cheese burrito to create the exact same item."

That was my accomplishment for the day. Somehow, I wanted to set the record straight. Someone might read the fan page and think, "Damn, it's gone forever. Life is so tragic." But then they read what I wrote and realize it's simply a semantic removal. The item is still available but they made it a little more difficult to buy because you have to add ingredients verbally to the order of a bean and cheese burrito. very odd, but interesting in a pop-first-world-problem sense. 

Sunday, May 17, 2020

Patio

The heat generated from burning 2 million years worth of compressed and liquefied bacteria known as oil has led the southwest to become an inferno. The answer is obviously to stop burning oil but that can't be accomplished without some wisdom and forethought so the second best answer is an outdoor patio with misting hoses from a hardware store. This required running water from the other side of the house though the attic and a hole in the porch roof but I was cutting holes in the porch anyway.
Lots of sloppy pavers, a couple chairs and a misting hose zip tied overhead. every castle needs this. 10 bags of sand to level one area. The rest will be wobbly and uneven because I'm not going to spend a fortune to level a lawn.

Friday, December 13, 2019

Valley Drainage

I can't help feeling that the only solution is to tear the garage down and start again. But that seems too extreme, so I tried again to solve the drainage issue of these ridiculously designed roofs. This is Before...my latest work, but after my attempt to cover the earth in asphalt. The roof still leaked with this much asphalt because it didn't drain and the pond slowly penetrated a few nail holes.

Step one was skipped, when I struggled to make a 20 foot long evenly sloping wedge. It involved more math than I care to admit because it goes from a 30 inch wide piece to an 8 inch wide, and each of the three pieces of the wedge had to be centered. It sucks experimenting with money I don't have for these projects but financial stress is the homeowner's default status.

I tried to salvage some of the paper but it was easier to simply cut it so I could put some tar paper, then some ice and water guard (expensive stuff), and the final cap layer of rolled roofing...which I did not affix with nails because that caused the problem to begin with. I used adhesive sealant.

End result, The wedge of OSB, then tar paper, then ice and water guard, then the rolled roofing slipped under neath the older roofing (that sounds easier than it is to do) Then I buttered the seams with adhesive and weighed it down with some stones and bricks that you see on the roof. I knew that once the adhesive cured then the seams would be water tight, but this is no the ideal procedure since it's a clusterfuck of messing with old roofing and working alone on a 20 ft length of rolled roofing. I couldn't manhandle the long rolls of roofing so I ended up with two seams that required real attention since they are the critical aspects. You can also see my butcher job on the neighbor's roof, since I'm doing a patch job and slipping roofing under old roofing that was too delicate to touch and trying to limit the amount of damage.

I feel the lesson of the roof project is still an issue of my attempt to save money by struggling against the grain. The neighbor's roof needed to be torn off to make it easier to build back up again properly, but I did not want to go to that extreme because that would really force me to rebuild my whole roof with a better pitch, rather than this ridiculous mild arch? And I didn't want to do that either. I just want a few years out of this garage before I get extreme so I'm trying to keep the work and material at a minimum since it could be considered throwing good money after bad.

Here's a photo...two different sink drains. The one of the left is the one attached to the roof vent. I don't know the story behind what happened but someone abandoned the drain on the left and attached the sink waste to the drain on the right...or maybe they added the drain on the right through two walls because the left one was plugged. Either way, they didn't provide any venting for the drain on the right. Way to go! So, there was a loud gurgling from both the kitchen sink and the bathroom sink when the water was running because, I gather, the suction was siphoning the water out of the P-trap. Great! So, my demolition revealed what I suspected: no vent. The water just goes directly down into the house drain (which is another mystery that will be investigated one day)  It was a classic case of plumbing 101. Either tie the drain to a vent or... I purchased a basic air admittance valve, and rebuilt the drain to include the AAV.

This might look easy, but the critical thing is to build it with a slight slope down from the P-trap to the final drain pipe. I managed to build it close to perfectly level and the old slip joint connections all dripped, so I have to rebuild them with new pieces instead of being cheap and using the old stuff. Fine. Whatever. I will say that the AAV fixed the gurgling sound. Actually, I don't know how the water drained at all except it siphoned all the water from both traps to create air above it so it could drain. Then I realized the drain that had the vent is basically a direct vent into my sink cabinet, which reeks. So I'll cap it off.

Wednesday, November 27, 2019

Domestic Futility

Domestic Tranquility Futility:
Home ownership is all-consuming. The problems can't be ignored so my life has recently leaned in the direction of servant to a house. I waited for the rain to show me the leaks and it showed me 4 leaks that I attacked with asphalt cement and fabric tape.

I also finished the laundry room project that involved finding some kind of pipe about 1 inch below the surface of my lawn. I didn't hit this one with a pickaxe because I suspected it was there. I have no idea what this pipe contains or if it is obsolete. I was sure it was cast iron but it changes into some kind of yellow plastic. (EDIT TO ADD: This is FLEXIBLE YELLOW GAS LINE. Most definitely active. buried 1 inch deep, connected to black pipe. They flexed it under the alley)

Very practical solution to avoid dealing with black pipe. Can be connected to black pipe with a transition adapter. BUT CONSIDER BURYING IT DEEPER THAN 1 INCH!


The garage door wasn't too complicated. A box rail, hangers, some finesse with a drill and then a basic frame to hold the corrugated metal. I need some ideas for painting something on the door because it reflects the sun into my face and blinds me to the point I think it could start a fire.


I'm trying to win the award for ugliest roof but there are some very ugly roofs in this neighborhood so I won't even get a ribbon for participation. But in the race for worst conceived roof, I stand a chance. My neighbor's roof pitches down into my roof, which is a very slight arch. They meet like two bull Elks fighting for mating rights over a harem. But there is no slope horizontally so the water puddles on top of the seam and drains onto my motorcycles underneath it. This is going to be very interesting to solve but I have an idea for something called a "Hog Valley" Now I can call it an asphalt cement valley because I covered it in asphalt patch. Believe me, when I was roofing the area I stood on to that this picture I knew that valley would be a problem, but if I even breathed hard on the neighbor's roof, the material tore in shreds. But the house was vacant so I didn't know what to do, spend money fixing a neighbor's house, or fix my roof the best I could and deal with problems when the house next door was purchased and I could talk to the owner.

The worst decision was connecting the two garage roofs into one seam. With no horizontal slope so the water doesn't drain fast enough. Such is life.

My plan to solve the drainage issue with the roof is to build a false, upraised valley on top of this valley using roof decking. Then cover that with tar paper. I plan to use trapezoidal cut pieces of decking that will create an artificial slope in the direction of the yard. It's too complicated to explain and I'm sure any experienced carpenter would advise against it, but my mission with this house is to learn the hard way and possibly create new solutions to old problems. I want to know why something failed. For instance, I learned that any exposed nail head, even if it was obviously nailed down, will probably leak if the roof was installed using zero asphalt cement on the overlapped seams. That's how my roof was installed and all the nails leak. The asphalt cement on the seams at least gives a chance to seal around the nails, but there's a blind nail method that's even better. None of those effective methods were used so they basically laid a roof down and nailed it down, which doesn't last at all. I only want to limp this roof along until I can pay for the metal roof that I will install to the top. That's all.


Clear day between late fall storms.

A view of the man cave, metal door, illegal electrical subpanel, utility sink draining to god knows where, etc. etc. One day there will be a plaque....Oggy Bleacher Worked Here.

Saturday, August 10, 2019

Brief Update

It's really impossible to do any house repairs when located 300 miles north of the house. But this is the way I thought would earn me some money and blah blah blah, get me in a position to do some work on the house. I recently made a long trip back to the house that involved several police encounters. It's aggravating as fuck to be routinely molested and fucked with by law enforcement. The van is a cop magnet so I bought an '83 GS850 motorcycle. The speedometer has 145 mph as a top speed so I'm thinking I can leave the cops in the dust.

Oggy overlooking a volcanic cinder field. His sweet '83 GS850GL sits behind him.
I ask myself, maybe too often, "Am I writing my own story?" and a lot of the time the answer is no, fuck no! Sometimes I am writing my own story but the trees and the forest become blurred so I think I'm not. Other times I really am just a pawn being pushed around a board pointlessly, going through the motions like some hired cock, looking forward to some distant day in the future when I will take control of my life again. Then I think, 'Why wait?" and I quit whatever I'm doing because, why not? why wait? I'm definitely at an age in life when I think, "If not now, then when?"

Like with this house, I was thinking that if I don't buy a house now then is there some other distant time when it will be more appropriate or timely? If not now, then when? I tried to buy a house in Mexico back in 2015 but the stars didn't align.

Same goes for a transcontinental motorcycle trip. If not this Fall, then when? Exactly what time will work for that kind of trip, if not immediately? I'm not getting any younger and if I were indeed younger I would likely not have the wisdom to make the trip a success. So, this is the time to do it. Now. Today. Well, that's another story.

I did return to the house because I knew the rains were on the march and I knew at least one leak still existed in the house and I was also getting a bit nervous about having the gas and the water and the electricity on in a house that had been neglected for so long. So I drove way down toward Mexico with a small jack hammer, a weed wacker and a ladder and an electric dryer (for future use)

At home, destroying a crappy piece of plywood that hides...

...a totally uninsulated roof. No wonder it's so hot. It's just a porch awning with a low ceiling.

This single nail that sunk below the rolled asphalt roofing is the cause of the one leak in the roof. I really scrutinized the roof but did not cover this hole with the elastomeric coating which covers the seam next to it.. You can see that I missed the nail by half an inch in favor of getting the seam....but the nail was more important. This time, I used the real asphalt patch so now this hole will not leak.

Looking north over the metal shed roofs to the copper gap.

A fruit tree? Maybe apricot, maybe peach. Not sure yet.

The garage roof looked to be in good shape but it had not rained much since I left. It doesn't rain in Arizona....it pours. It's like the monsoon season of Costa Rica. The rain is epic when it comes, like a hurricane.

That's all for now.

Sunday, April 21, 2019

Drip Edge Overlap


Here we have the south side of the house.* I count 4 layers of rolled roofing...and probably 2 layers of felt paper. The top layer of roofing has almost no adhesive bonding it to the layer underneath, but the top layer is in OK condition except for some blistering caused by the fact no adhesive was used and it wrinkled. Any issues with this roof are not because of old surface roofing. 

The photo above shows the ridiculous method previously used of wrapping a piece of wood in the edge of the roofing and then nailing it to the fascia. I could tell how well that worked when the wood turned to dust as I broke it away. Now, to be fair, the roof was installed when Jesus was a Corporal, so hey, that's a long time. Nothing lasts forever but this method doesn't meet my high standards so I'm going in a different direction.

Here's what it looks like after I tore the old edge off.

I started thinking, which is bad enough, then I started watching DIY videos which is worse. I had a goal to work purely from instinct but my instinct is to look for example videos of how other people have done these kinds of repairs. Basically, no repair I'm attempting is the first of its kind, but all the repairs I'm doing are because someone failed in their attempt to repair it. Is the person who wrapped the asphalt paper in a circle around some wood waiting out there for me to call them? Probably they are long dead.

DIY projects invariably decay into a series of experiments that take a long time to get results back. So long, sometimes, that the person has sold the house and the new owner thinks the experiment was a bad attempt. Maybe, and maybe not. Maybe it was an experiment like the ones I'm doing.

The specific issue I'm dealing with is rolled asphalt roofing. This is sort of the same material as basic asphalt shingles, except it's a 3' x 35' shingle. Owens Corning has this PDF for my examination and enjoyment.


It is all right there in plain English (and Spanish) and even a diagram. There are no nails at the bottom of the roll near the eave. That's an interesting detail because all of the eaves that I'm repairing have nails in the edge. I think that's because there is no asphalt adhesive used. Ok, so that's the detail I'm puzzling about. Asphalt adhesive is the product to use to bond the top layer of roofing to a 9'' strip that has been nailed on the eave. In my specific house there were 4 layers of rolled roofing both adhered with cement and also nailed. So, the next person was thinking, what's the point in using adhesive to glue the 5th layer to the 4th layer. Maybe they have a point. A nail secured the roofing to the next lower layers. Now, some of the nails were actually too short to penetrate to the wood deck, but let's forgive them for that detail. They were attempting to fasten the top layer to the bottom layers and the bottom layers were secured to the deck, so in theory they were trying to do the right thing. And they saved a few bucks in the process by ignoring roofing asphalt.

Now, the big issue that I'm looking into is how to add a proper drip edge to the eave...that has never had a drip edge. Ideally, in a perfect world, I would get down to the wood deck and slip the drip edge underneath all those layers of rolled roofing and tar felt. But in this reality there are hundreds of nails and asphalt cement bonding this huge tar sandwich to the deck. What to do? Well, I slipped the drip edge into the one place it would go, under the top layer of roofing and the next layer under it. Then I nailed it down and smeared some asphalt adhesive under it too.
Here's a literary illustration of what I've done.

TOP LAYER ROOFING
----------------------------------
DRIP EDGE
..............................................

THICK LAYER OF 4 Layers of OLD ROOFING
==================================
==================================
Wood Decking
_________________________________________

Now, drip edge should be installed immediately over wood decking. And to do that I should tear up the mess that exists at the eaves of this roof. The extent of this project is not so vast that I don't have time to do it. I could probably demolish the entire roof in one day. But, what's the objective? The theory is that the drip edge should be the last line of defense for water that is running down the wood deck. But the deck in this case are horizontal boards with hundreds of holes in them and gaps between them. In short, no water is ever going to run down the wood from any leak and get to the drip edge. No, the water will run inside a gap or nail hole and drop onto the other roof under this roof. So, the drip edges I'm adding are purely for one purpose...to direct water running off the top layer of roofing away from the house wall. Any leaks or other problems will not involve this drip edge no matter where I put it. There are so many layers of roofing and it's all asphalted together that there's no way to 'do it right' because I could only break everything down and start from scratch, which I'm not going to do.
So, I'm back to doing the best I can to add a drip edge with the only goal of improving the water shedding at the eave. yes, water from a leak will theoretically go UNDER the drip edge if it makes it to the eave but I don't see how the water can possibly reach the eave if it's going over hundreds of holes and gaps in the wood deck. If you think about the wood deck of a roof you imagine a smooth, nearly water resistant surface. Well, that's before you nailed thousands of nails and staples in it. Yes, water will leak behind the roof surface eventually, but the videos of roof leaks rarely involve someone saying "See, if this drip edge had been properly installed under the felt paper then the water would not have been trapped at this point an inch above the drip edge. " 
No, the leak immediately finds a way into the attic. The drip edge does one job: shed water from the top layer of roofing. Sure, install it directly onto the deck. Why not? But don't delude yourself that a leak under the roofing material and the underlayment to the deck and will run all the way past a hundred holes and gaps in the decking until it finally gets trapped at the point where the drip edge was nailed over the underlayment. I see that happening if an entire section of roofing material was torn off and water poured in from a hurricane directly onto the wood deck where it ran under torn roofing and tar paper. Sure. But a little leak that reaches the felt paper will go to the nearest nail or staple hole and go right through to the attic underneath the roof deck. The drip edge placement is best directly on the wood deck of the eave. But in my case when there are 4 layers of roofing material nailed to the roof, then the second best place is beneath the top layer of roofing.

This brings me to another issue I'm pondering: The prevailing wind rake. 

The 'rake' is the part of the roof that is sloped.

here is the prevailing wind rake of my house. The abuse is evident.

here is the non-prevailing wind side of the house. This is the 'Lee' side of the house. It doesn't show as much abuse.

I got a better photo of the Lee side of the house so let's use that as an example. Imagine this were the windward side. Now, the same method of rolling the roofing material around a piece of wood and nailing it into the house was used here and it's all decayed and ruined so I'll be adding a drip edge around the entire house if everything goes well and I figure out a method. The experiment I want to try is to focus on the windward side of the house which is a rake. The leeward rake needs a drip edge but little water probably sheds from this side so it's not a huge priority. The winds here are strong and the windward side of the house gets a good burst of wind...when it rains the water pounds this one side of the house almost horizontally. Now, WHY would I follow the directions and install the drip edge under the rolled roofing and over the tar paper? Why do that? That will create an edge, that is nailed down and adhered with cement to the drip edge. Why not, on the prevailing wind side of the rake, staple and use cement to fix the tar paper to the wood deck. Then use adhesive to fix the roofing to the tar paper. THEN install the drip edge over everything and lay a good bead of cement under the drip edge before nailing it down good and tight. Yes, the surface of rolled roofing is not as flat as wood so there would be some rolling in the edge, but the layer of cement or butyl tape under the rake drip edge would seal those small imperfections. Then...when the wind blows water against the rake...the first and only thing it hits is indestructible galvanized drip edge. There is no lip of asphalt or tar paper or nails to loosen.

My visualization of this scenario has me hearing a voice of experience saying, "Oggy, a properly adhered underlayment with a concealed nail method...a 9'' strip of roofing material nailed over tar paper that has been cemented to a properly primed drip edge on the rake will create the same impenetrable seam that you are trying to create with a drip edge nailed over the entire edge...plus, any repairs to the roof will now involve removing the whole drip edge and risk damaging it...when you normally don't have to touch the drip edge to replace the roofing material since it is installed under the top layer."

I hear this voice of experience and answer: Ok, you think you're so smart. Why not DO BOTH? Huh? Why not cement the tar paper to the deck. Then nail the primed drip edge over the tar paper. Then nail the starter strip of roofing material to the drip edge using asphalt cement. THEN, once you have confirmed the asphalt sandwich you have created is solid, THEN add an additional drip edge that is shorter than the drip edge below it. Then you have triple protection on the windward rake! I'm not talking about doing some insane experiment around the entire roof. No, I'm focusing only on the windward rake that takes the most abuse. Why not use everything under the sun to keep water out of that area? Kind of like my plan to cover this roof with a metal roof. But this roof is already covering another roof. And this roof is made of 4 different layers of roofing. So, if the original roof includes 3 layers of roofing...and this roof includes 5 layers of roofing and I add one more layer of metal roofing...THEN THAT MAKES 9 (NINE) ROOFS over one house. Again, the problem with water infiltration are not the roof....the problem is the cracks in the stucco and the rakes and eaves allowing water to run under the roof along with the Vigas directing water back into the house.

here's another written illustration


_______________(top drip edge nailed to....
|    Top Layer Asphalt Roofing
|    cemented layer of felt
|     felt cemented to primed drip edge
|    _______________ (bottom primed drip edge nailed to....
|     |
|     |   WOOD DECKING
     |
     /


It's possible someone might say, "Oggy, what you're describing won't look good." So I include this photo from my roof. Does this look like a place that is concerned with aesthetics? We have literally rusting metal roofs...decaying fences...a huge pile of arsenic laced, rust colored, lead rich soil surrounding the town. The alley is unpaved. Dogs run freely. This is a town for practical people. All that matters is keeping the rainwater out of the house. If you can do that then you have succeeded.
*I'm tempted to make a video showing how I approach this but that might trick some innocent viewer into thinking I am trying to train others. No, that is not what this blog is for. I'm only trying to record my process of DIY thought. Training is not done on videos. We aren't in the fucking Matrix where you click "Download" on a "How to be a roofer" file. No. In the real world it takes years to learn the finesse involved with each process, let alone the decades to learn the insane number of products one can use. Have you seen the caulking aisle in the hardware store? It's insane. Many ways to get the wrong item. It's like going to the store and accidentally buying "Low Fat" cream cheese...as though a person eating cream cheese is counting calories for fuck sake! Well, you go to the cereal aisle and accidentally get a frosted flake you didn't intend to buy....and you're going to eat it. I'm sure you will. Because it's all the same cereal. Well, you're fucked if you get the wrong caulking and still use it. This is just an example of the infinite combinations of the wrong material you can purchase that will cause a huge mess and make you look like an asshole. The difference between Cement and Adhesive is pretty significant although any innocent person would think they are the same thing. Cement patches holes when used with fabric....Adhesive binds two new surfaces. In short, don't think I'm training anyone about these topics. I'm a philosopher, not a roofer. The process and underlying principles are important because the roof and my flesh and blood are all going to be wearing a wood suit one day. The principles will remain.

Saturday, April 20, 2019

Weep Screed

I know I'm voyaging deep into unchartered territory when I start reading about weep screeds. Weep Screeds are basically a water shedding feature at the very bottom of stucco buildings. ( my house doesn't have one)

Speaking of new discoveries, I tore into the rotting wood roof trim and discovered the roof is not the roof. This adobe house has a parapet roof that the previous owners got tired of dealing with so they had someone build a roof on top of the roof.
Image result for adobe parapet roof
Here's an example of authentic parapet walls on an adobe building. Probably similar to the original roof on my house.


I knew something was odd when I looked above the ceiling in a small rafter space when I was messing with the kitchen light source...and I felt I was not high enough to where the ridge is, but my head was 2 inches from the roof sheathing. Well, how is my head 2 inches from the roof sheathing but I'm not 11 feet above the ground? I had other problems on my agenda that day so the mystery remained until I tore into the wood trim.
Here is what a roof built on a roof looks like. Decaying old asphalt paper under a framework that holds up more sheathing and another roof. It looks like a normal attic crawlspace, but there is no access to this area from the inside of the building because this is looking at the top of the original roof.
The original parapet roof is low pitch. Maybe there is no ridge at all. I will find out when I take off that awful Masonite junk that is giving the illusion that it is siding, when it is really hiding the framework of another roof. There should be a vent somewhere in there but, you know, who could be bothered to cut a hole and put a vent?


The wind was blowing pretty hard today so I did not finish the new fascia and drip edge. But I got an idea of how I'm going to install it around the whole house. This eave is the most important because water runs onto stucco. The original wood vigas were ruined and also the source of water into the walls that caused water damage. I think. So, I used the widest fascia I could find (12'') and the widest drip edge I could find (4''). At worst, it gives the elements one more thing to destroy while I decide what to do about this roof. It's nice to buy a house that not one person knew had a false roof. Even if I had gotten an inspection, I doubt he would've torn off the fascia to figure out there was a false roof. And it wouldn't have made a difference.