Like most people I'm troubled by current events. There's a saying that if you don't study history then you are doomed to repeat it. Well, I'm seeing a lot of repeated history by people who have studied history. So, isn't it fair to say that if you study history you are guaranteed to repeat it? Maybe merely studying history is not the way to avoid repeating history. Maybe we should study wisdom, not history.
To replace punditry I've got some serious house projects that I'll describe the photos below.
 |
I completed the insulation of the ceiling. I ended up with R70 in some places. A layer of R13, then perforated radiant barrier, then two layers of R30 and then 3/4'' insulated foam board custom cut to fit between battens where the metal tile ceiling is going to go. Installing fiberglass insulation in an occupied house is horrible. I am waiting to install the metal tiles in case the roof leaks and I need to find the leak, and also because this ceiling isn't that bad to look at. I think a light cream colored tin ceiling tile will be my choice.
|
 |
The last remaining exterior wall with this crappy cardboard siding was looming but it involved working from my neighbor's yard since this adobe house was built exactly on the property line in the tradition of Sonoran Row Houses. The decision to build on the property line is made all over mexico. the lawn is always in the interior of the property and never on the perimeter. The only way to accomplish that is by building the home on the perimeter, which isn't permitted in most cities that require a buffer between houses.
|
 |
Zero insulation, zero house wrap, zero flashing around windows. It's just a shed attached to the house.
|
My goal was to insulate it, replace any rotting wood (I found two board that were water rotten because the siding leaked near the window corners, and replace the windows with double glaze variety.
 |
It only took about 4 days to replace the windows and insulate the cavities and then get new smartsiding. I was going to have a seam in the siding no matter what I did since the roof slopes above 8' long, so I decided to split the seam below the window. The strategy worked to allow me to lift the pieces since they were manageable even though I'm too old to be doing this kind of work in the heat.
The only debate was whether to nail the trim around the window and then cut the siding around the trim...OR to cut the siding around the window and then cover the seam with the trim. I've seen this done both ways but the strategy behind cutting the siding around the trim means you only need to remove the trim to remove the window. That makes sense except how often are windows replaced? It's like opening up a big area to leaks just for the convenience of being able to remove 4 boards of trim to take the window out. The strategy that I used was to cut the siding around the window, pretty tight, then fill the little gap with caulking...then cover the gap with the trim. This leaves very little room for water to get behind the siding, where it will run down the tar paper I used as house wrap. And that little sliver opening is covered with trim. But if the window ever needs to be replaced the whole piece of siding will have to be removed. See? But I cut the siding to be a single piece around each window so it will probably be easier to destroy that piece and replace it with a new one. Like I said, replacing windows is not routine maintenance so why would I make it easy at the risk of letting water get behind the siding? Debates like this take at least a month for me to resolve. Window installation is easy to get wrong. |
 |
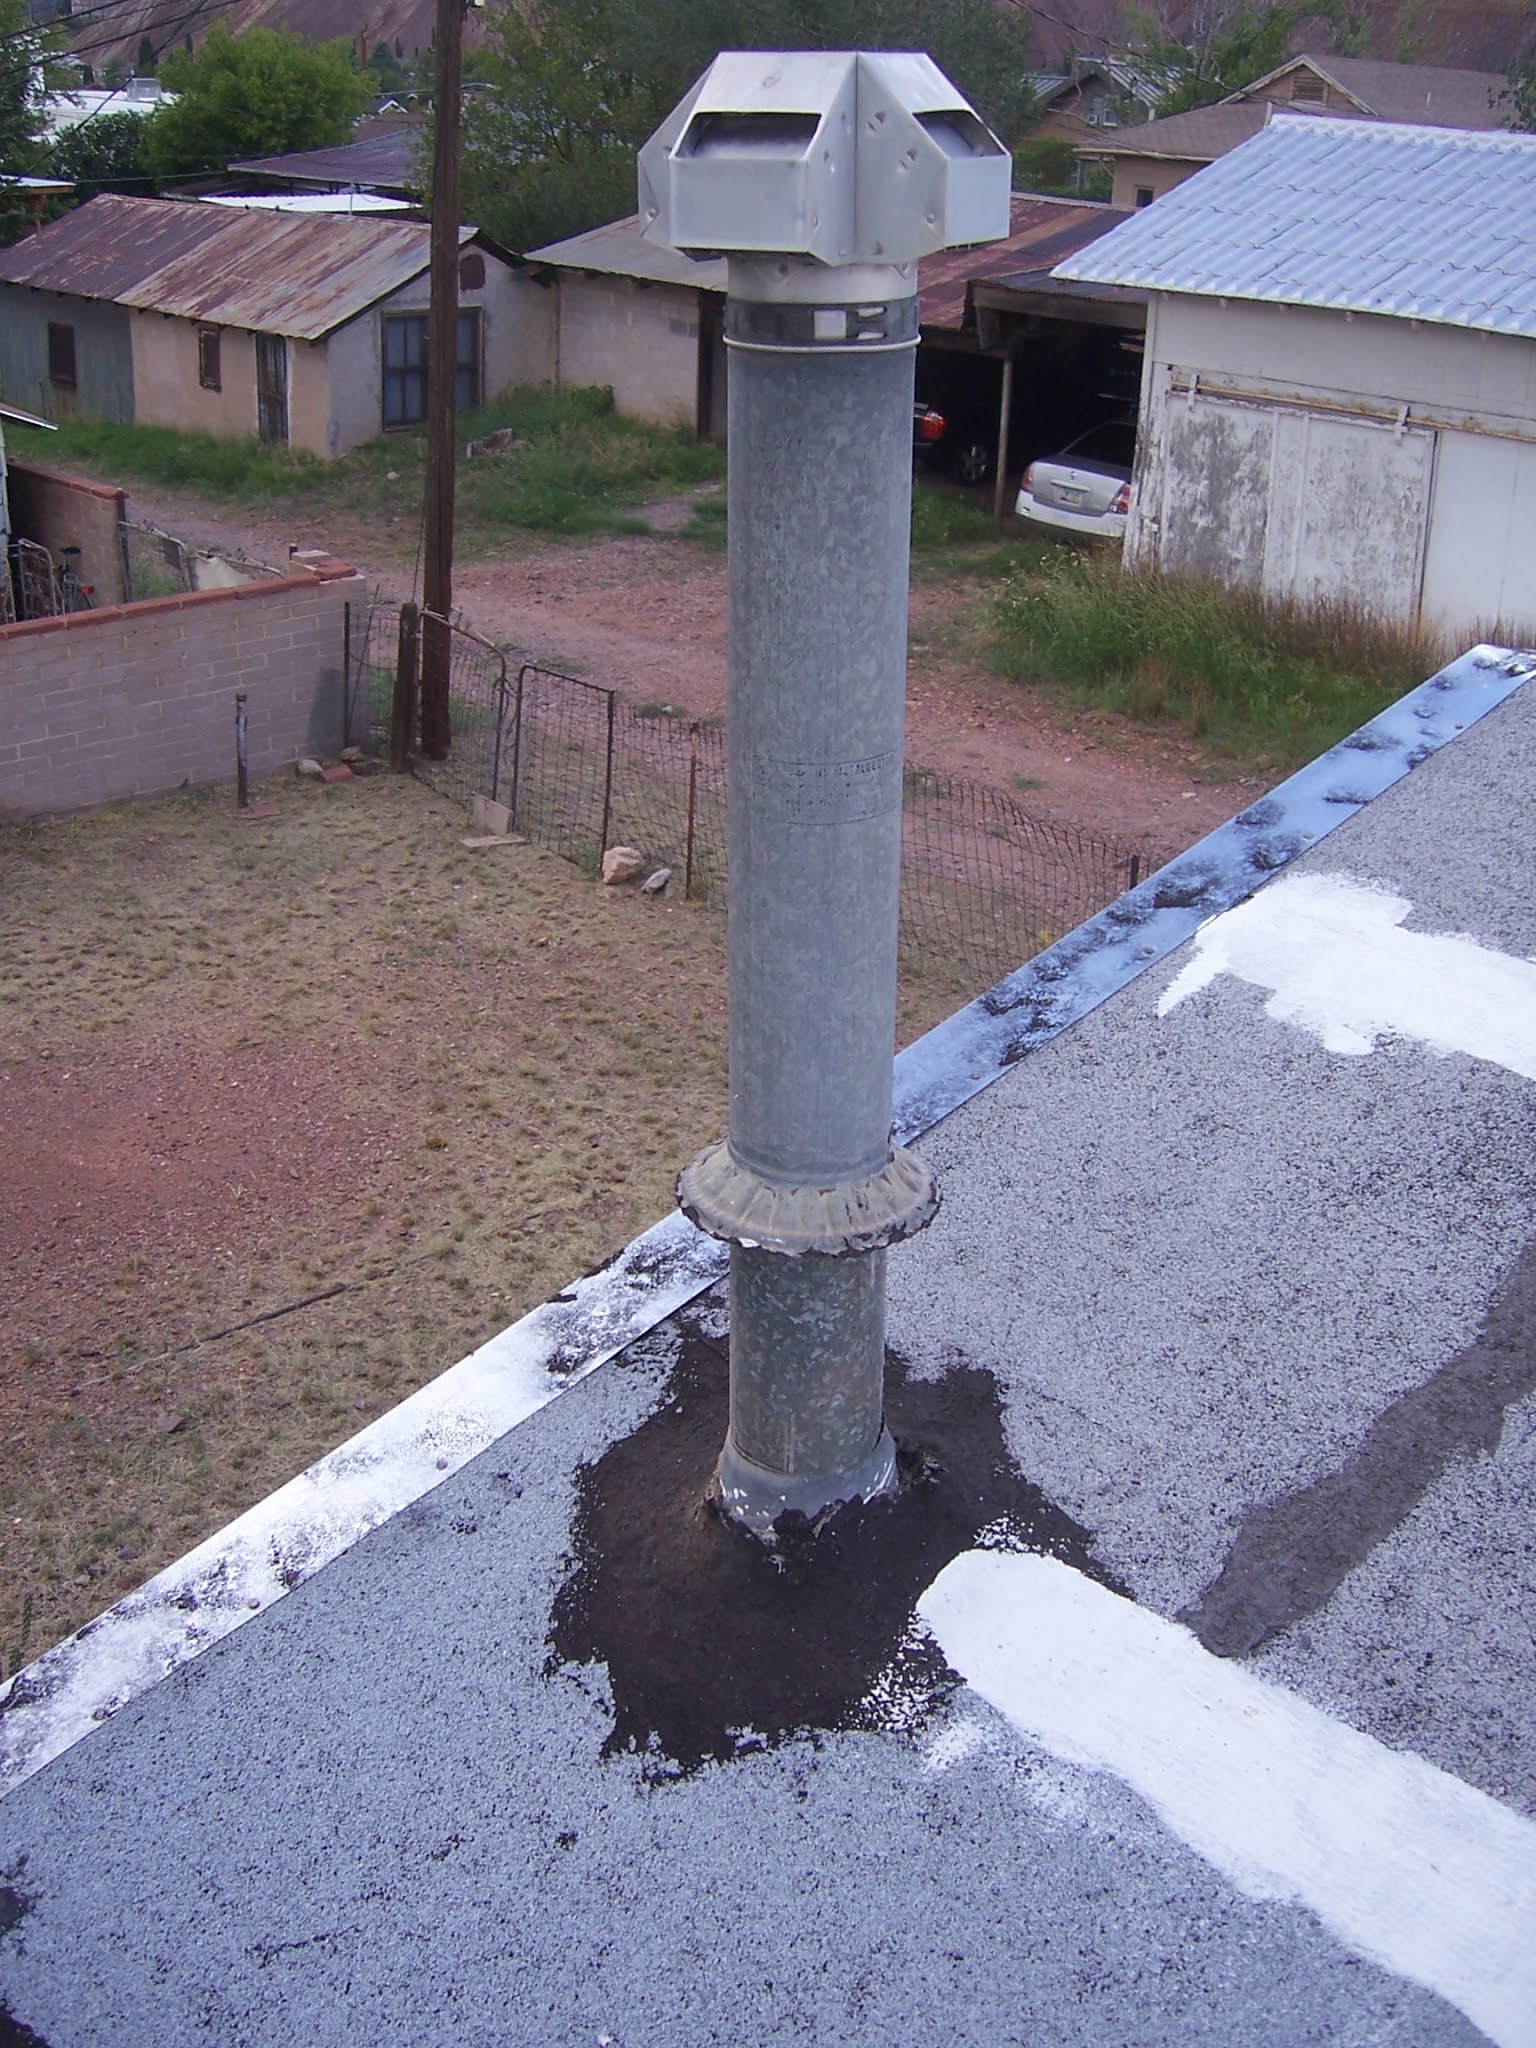
In preparation for the metal roof I wanted to relocate all the vents so they exit the gable side and not the roof. This particular vent is for the gas wall furnace that may or may not be useful now that I have 2 heat pumps. But I knew it was going to either be eliminated or at least moved.
|
 |
| In hindsight I should've just cut an area around that metal boot and torn it all up since the boot would not lay flat no matter how hard I hit it with a hammer. And I thought I was going to use purlins for the metal roof but now I'm leaning toward bubble insulation and this is going to be a little hump in the roof that will cause problems. So, I expect I will be tearing the patch out and making it flat so the metal panel will lay flat. |
 |
During all this there was an unexpected plumbing problem. Water from the kitchen and bathroom sink was backing up into the bathtub. I suspect it is an abandoned drain for the bath sink that had concrete and caulking inside the drain and that debris worked its way to the intersection with the tub and kitchen...and blocked the drain so the easiest path was back up through the bathtub drain. And when I went to investigate I found the Ptrap was actually buried in dirt and resting on a rock that had broken through the material. Miraculously, this didn't leak the whole time I was using it. I don't know why. Maybe it was perfectly sealed by the dirt. So, I went from blasting water with a nozzle jet through the drain and also whipping an auger around in there so it drained completely and easily (god knows what kind of debris I blasted down the drain)...to replacing most of the ptrap plumbing and the Tee and then learning about a bath tub shoe that goes under the tub. I replaced all that and for the first time the shower does not back up even a little when I take a shower. It drains faster than the water flows.
|
 |
This was taken before I replaced the ridiculously old bathtub shoe part.
It's legitimately a 1-3/8'' size from 90 years ago that required a custom cut compression gasket for the mismatch connection...There are 1-1/4'' to 1-1/2'' gasket adapters and someone had taken one of those and snipped off a sliver of the 1-1/4'' side to accommodate the 1-3/8'' bath shoe. I thought this was clever since there is no such gasket made and it did allow the two sizes to effectively match and not leak. But I didn't like that solution so I bought a 1-1/2'' tub shoe and made a proper connection to the new 1-1/2'' tee. super exciting stuff.
|
 |
| The water heater vent was always wrong, from day 1 it was wrong. There aren't supposed to be bends below 1' from the vent hood. There shouldn't be any tape. And the duct is supposed to be Type B gas vent that is double walled. So, the original attempt was wrong in every way except that it didn't actually vent carbon monoxide back into the kitchen and kill me. Since I was moving the vent exit from the roof to the gable I knew this was the time to replace the wrong vent pipe and why not cut a new hole in the ceiling so it only needed a straight piece to get out of the kitchen? |
 |
New Hole cut...debris fell into my cereal boxes
|
 |
Temporarily cover the area with drywall since all that crappy cellulose ceiling tile is destined for the dumpster but I don't want to get into it right now because my hands are full and it will require covering everything with plastic tarp since the cellulose is awful stuff and should be treated as bad as asbestos. I hosed the area down with water when I was moving the two tiles to mitigate dust. There were 5 staples on the downhill side and 4 staples on the inside edge. That's all that is holding those tiles up since the other edges are tongue and groove.
This vent project was actually quite aggravating because assembling the correct double wall pipe in the correct lengths required trips to three different home repair stores and they all had different brands of pipe that was not compatible. There is Amerivent, Metalbestos, and some other brand. none of the connections really work together. So, I had to make it all work and in the process I purchased some flexible vent that I thought was going to work but it turned out that it was not supposed to go in attics or through walls or through ceilings. You might wonder where flexible vent duct CAN be used, and it's basically only suitable for inside a basement from one section to another section. That's it. Of course I snipped a hole in it when I was removing it so I can't return it. The lesson is to keep it simple and use pure double wall vent pipe...3''...Don't get fancy or use any gimmicks like flexible pipe. It'll cost about $80 to get all the right pieces and you should buy them from a single supplier so the brand is identical, but this stuff will last forever.
But I did successfully reroute the vent directly up from the water heater, then a 45 degree bend toward the gable, cut a new hole in the siding and then another 45 degree up, where I ran out of vent pipe and now the cap is like an inch above the roof. But it's 3 feet from a window, which is what the rule requires so, it's fine.
|
 |
This is the area between the two roofs. The new water heater vent now goes through the gable side of the fake attic. Doing this work in the heat of Arizona summer was tough. There's not much room in there to work and I had to cut a hole and connect it all. But I did feel that the gable vents are doing their job venting the attic area of hot air and vapor to the point that cutting a ridge vent would really be a bigger risk than I need. It was hot, but not hotter than my vented garage. So, the juice isn't worth the squeeze in that dept. The attic vents adequately. I'll add radiant barrier foil to the attic surface. So, I'm not venting the ridge.
|
 |
I have this old pig leather jacket that could only be saved with an AZ state flag painting. For what it's worth, the colors are Buttercup Yellow, Sapphire Blue, Fire Red and Metallic Copper. There are 13 rays to represent the original colonies, the red and yellow represent the desert colors, the copper star represents the copper mines and the blue represents the vast oceanic shore Arizona is famous for.
|
 |
I added two awnings made from asphalt roofing material. I wanted more shade but only had enough roofing to just barely fit over the window, which kind of exposed the bracket that I now suspect won't last very long. It's wood sandwiched to a perforated metal flat bar. The metal will last and the roofing will last, but I think the wood that I used to screw the roofing down will all rot away. Who knows? I had to angle the awning down because I only have about 4 inches of my property before it reaches the fence and a longer awning with a more flat angle would've crossed into my neighbor's yard and I didn't want to cause problems. The foliage in the foreground turned out to be a Buckhorn Cholla cactus and a spiky plum tree that cut me more times than I can count.
|
 |
Most recently we had significant rain for the first time in months and a few holes in the roof leaked down to the original roof and then ran down to the eave where it leaked into the house. This required going back into the attic to find the holes and then go back on the roof to find the areas and cover them with more asphalt patch. I just want to buy some time until I get the metal roof. You can see the single nail hole leaked rain onto that 4x4 beam. Luckily this is the desert because that kind of leak could destroy that beam over time. It only sees rain 2 times a year.
|
 |
The water heater vent is barely legal. I plan to add a 1 foot piece to get the cap above the ridgeline but that requires a trip into town and spending more money, which is in short supply these days. The bathroom window area needs work, but again, I am focused on the roof for now. No more spending money.
|
 |
I think it's a drip scree that I made from a door sweep to kick the water off the door and off the threshold. It worked, but rain still creeps in under the threshold, which I will fix with more concrete to act as a dam.
|
 |
Obviously not my house but a good example of my end goal.
|
Desert Chic is the effect I am aiming for.
Well, that about catches y'all up. The next and last project I want to do is the metal roof. I an confident the install will take a week but the process of buying the package is taking weeks. No one wants to sell it to me because they aren't sure they can deliver it to this area and I can't find a rental truck big enough to fit a crate full of long roofing panels. It's dragging on.
On an unrelated note, I found myself updating a fan page for taco bell burritos. See, Taco Bell took 7 layer burritos off their menu. Fine, that's their prerogative. But I looked at their menu and they have bean and cheese burritos...to which a customer who loves fine dining like myself can add, lettuce, sour cream, tomatoes, seasoned rice and guacamole. See? You can add the exact ingredients to the bean burrito that were in the 7 layer burrito, thus making a 7 layer burrito. There's a connection here to home improvement but it's too complicated to explain. The joke is that Taco Bell removed the 7 layer burrito from the menu, but left a loophole in the menu that still lets you simply build a 7 layer burrito with add-ons. So, why didn't they simply have a pre-programmed button on the register that creates a seven layer burrito? Like a heritage button. Instead of having to say, "I want a bean and cheese burrito, no onions, add lettuce and sour cream and tomatoes and seasoned rice and guacamole."
the cashier will say, "You mean a 7 layer burrito?"
"yes. just give me the item that was on the menu for 30 years but they removed it and now I have to manually create it."
It would be hilarious if McDonalds removed hamburgers from their menu but left meat patties, cheese, and hamburger buns on the menu.
So a customer has to say, "Give me a hamburger bun, one meat patty and a slice of cheese, pickles, no onions."
That sounds like a stand-up comedy bit. But the real joke is that my big accomplishment for the day is that I accessed the official fan site of Taco Bell and in the "history" of the 7 layer burrito, I added "This item was removed from the menu but the ingredients can still be added to a bean and cheese burrito to create the exact same item."
That was my accomplishment for the day. Somehow, I wanted to set the record straight. Someone might read the fan page and think, "Damn, it's gone forever. Life is so tragic." But then they read what I wrote and realize it's simply a semantic removal. The item is still available but they made it a little more difficult to buy because you have to add ingredients verbally to the order of a bean and cheese burrito. very odd, but interesting in a pop-first-world-problem sense.


No comments:
Post a Comment